Monday, December 20, 2010

Shimmery Snowmen - inspired by Don Cherry!


I made this card with 4 challenges in mind! Two from SplitCoastStampers & two from the PaperWorks Co (PWCO) blog.

I was inspired by *this* purple velvet with shimmery trim jacket by Don Cherry. And for those of you unfamiliar with this Hockey Night in Canada TV commentator; his opinions are just as loud as his jackets! *lol* People either love him or hate him, but he is a legend here in Canada. And the one thing I admire most about him is every week he talks about the Canadian soldiers who have died in battle. Brings tears to my eyes every time and I appreciate him taking the time to honour them and their families on national TV.

Alright, on to my card. I applied glue from a glue stick to my Purple Onion Designs Damask stamp and stamped on my purple cardstock. I then placed some purple "shiny transfer foil" on top of the sticky image and then rubbed across the foil. I lifted the foil up and there was foil on my damask background! The stamp is a bit distressed so my foil image is also a bit distressed. I like it; kinda reminds me of mercury glass.

For my snowmen image, I stamped & coloured the main image. Then I almost forgot to add the 3 snowflakes from the "recipe"! I inked up only the snowflake from the "A Magical Christmas" stamp, but accidentally got some ink where I didn't want it! However, it looked like a flourish, so I went with that! For my sentiment, I used my SU! Label punch, applied glue to it, then poured Martha Stewart "antique silver" fine glitter on it.

Thanks for looking!

::Supplies::

  • Stamps: Flaky Friends & A Magical Christmas -the sentiment & snowflake- (PWCO/RAM), Vintage Damask Background (Purple Onion Designs)
  • Paper: Marina Mist (SU!), "concord grape-like" (from my stash), Prism Smooth White
  • Ink: Going Gray, Tuxedo Black (Memento), Copic Markers (B0000, B41, BG000, BG10, E00, E49, R0000, R29, T0, V000, V99, Y00, Y38)
  • Tools: SU! Label Punch
  • Embellishments: light blue velvet ribbon (stash), fine Antique Silver glitter (Martha Stewart), pop-dots, shiny transfer foil (Stix2 Anything)

Thursday, December 16, 2010

Rosette Ornament


Guess what?! I'm the Guest Designer for Thursdays in December on the PaperWorks Co blog! I'm honoured to be able to create and feature some projects using some of my favourite stamps & papers.

Here’s a project featuring a double-sided rosette ornament and this week's SCS Technique challenge of sponging. This past Spring I helped make like 100 rosettes for my friend’s wedding escort tags and guess what? I still love them! Oh and our rosettes were featured on the Ruffled blog, too! I was *so* excited to hear that!

This rosette ornament is perfect for double-sided papers, like Echo Park Paper Co! My finished rosette ornament is about 5” in diameter and would be perfect either on the tree or on a wreath.


To make the rosette, I cut 2 strips of 2” X 12” from the Echo Park Paper. I then punched a border with my Scallop Diamond border punch. This step is optional. Then, I folded each strip of paper every ½”. I glued the ends of the papers together to make a circle. Then I pressed the centre of the rosette down, making sure my scalloped edge is on the outside. I weighed it down while I coloured in my images. Note: when glueing the images to the rosette, use a strong glue or even a glue gun and then weigh it down again with something.


For the oh-so-cute Owl, I masked the 3 bats to turn my Hallowe’en owl into a snowy owl. To make the night sky and the blue moon, I sponged some black and some blue inks onto my image. I also sponged some Liquid Pearls onto the moon and added Liquid Pearls to the owl. I added ‘snow’ by adding Ice Stickles to the branches. I coloured some of the buttons with some Ranger alcohol ink.


For the Mistletoe image, I also embellished with Ice Stickles for snow and Liquid Pearls on the mistletoe. Both paper doilies on each side were sponged with ink.

Thanks for checking out my lil’ project!


Supplies

Stamps: Happy Owl-O-Ween (RAM for PWCO), Under the Mistletoe (Christmas Freckle Collection - PWCO)
Paper: Raspberry Delight from the Sweet Summertime Collection (Echo Park Paper Co)
Ink: Tuxedo Black & Rhubarb Stalk (Memento), Aegean Blue (VersaMagic), Copic Markers (Owl: BG10, E0000, E00, E29, E49, R0000, RV14, T0, Y11. Mistletoe: B41, B97, BG000, E00, E33, E49, E71, G94, R0000, R81, R89, YG03, YG97, YR65.)
Tools: Mega Circle punch (Marvy), Scallop Diamond border punch (EK Success)
Embellishments: paper doily, Aspen & Alpine snowflake punches (Martha Stewart), White Opal (Liquid Pearls), Crystal Ice (Ice Stickles), buttons, silver baker’s twine, glitter ribbon, pearlescent beads, alcohol ink (Ranger)

Monday, October 25, 2010

Too *cute* to SPOOK!

I was honoured to be asked to a Guest Designer for PaperWorks Co's Sunday Sketch #56! Woot! Here's the sketch:


So I ended up making two projects; a framed creation & a birthday card. Here's the framed piece:

Aren't they the cutest?! That's the Pumpkin Patch stamp by Rachelle Anne Miller for PWCO! I wanted to do some paper piecing and so I reached for Basic Grey's new, double-sided Pyrus collection. I totally *heart* Basic Grey!!!

Here's the birthday card I made for a friend, using Echo Park papers, which are also double-sided!
Before I get to the supplies, PWCO just announced a Design Team call for December 2010-May 2011! Check out all the details *here*!

Now, onto the supplies! Thanks for popping by!

::Supplies::

Too Cute, to Spook

bonne fête

Tuesday, October 19, 2010

I *heart* Rachelle Anne Miller!

Check out Rachelle's blog post there to see how you can enter to win a quick giveaway!

Wednesday, October 13, 2010

Happy Thanksgiving


Here's my take on Paperworks Co's Sunday Sketch # 54. Will post more details soon, but here's a quick rundown of the supplies:

::Supplies::

Sunday, October 10, 2010

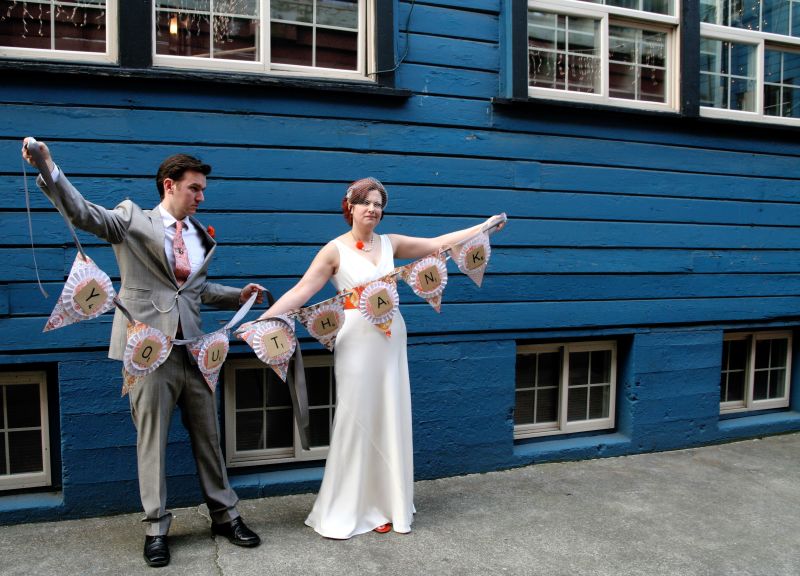
*THANK YOU* Rosette Banner


I'd like to begin sharing some of the paperie projects I worked on for my friends' wedding last April. It was truly a labour of love!!! It all started shortly after they got engaged a year ago. My friend called me up and asked if I would make their wedding invitations! I said "heck, yeah!". I was honoured that they asked me! Truth be told, I woulda been a bit hurt if they hadn't. ;-)

Since I *loooooove* paper and crafts and DIY, my involvement didn't just stop at The Invitations. Oh no. We had so much fun browsing wedding blogs, sharing ideas, brainstorming, & scouring thrift shops! I'll start by sharing instructions on how to make a Scrabble tile Thank You banner. Don't worry; I'll share the process of The Invitations (my 'babies'!) too, but not now.

In several wedding blogs, I had seen couples holding a thank you banner and thought that was so clever! I was inspired by this Memory Box blog post by to create a Thank You banner for my friends. They both love Scrabble, so I thought this would be perfect, except the Scrabble tiles would have to be bigger! Waaaay bigger. ;-)

Materials:
  • white cardstock paper
  • photos of Scrabble tile letters; take your own photos or find some on Flickr
  • dictionary pages, music sheets; scanned & printed or check out The Graphics Fairy
  • 12X12 scrapbooking papers (I used mostly Basic Grey's Ambrosia collection)
  • 6" paper doilies
  • glue gun
  • strong glue for paper (Zip Dry Paper Glue or Tombow Mono Multi Liquid Glue) or strong double-sided tape
  • nice ribbon
  • single hole punch
  • a bunch of objects to weigh the paper rosettes down (such as mugs, staplers, etc)
I took photos of the Scrabble tiles, cropped & resized them to be 4.5" tall. I printed them on cardstock paper.

I sponged some orange ink onto the white paper doilies.

To make the pennant banner, I used 12 X 12 scrapbooking paper in the colours of the the wedding theme; orange and grey. I marked the middle on the bottom of the paper, then trimmed it from a top corner to the mark and vice versa on the other side. The top is 12" wide. Use a single hole punch to punch a hole in each top corner.

For the paper rosettes, I printed some dictionary papers and music sheets from The Graphics Fairy onto 8.5" X 11" paper. Trim off the white margins and cut in half. The paper will be about 4" wide. Fold the paper (accordion-fold style) every 1/2". I glued 3 pieces together end to end with glue (strong double-sided tape also works) for each rosette.

To make the rosette, adhere the two ends of the long pleated strip together, creating a ring. Then, you push it together in the centre and press down. Use an object (such as a stapler) to hold it down for a few minutes. Then, take the hot glue gun, put a dab of glue in the middle, place the doily on top and finally add some glue to the back of the scrabble tile and press it gently down. Use the object to keep it weighed down while you work on the next letter.
Once all the letters are dry and stable, place them in order. Measure and cut some nice ribbon and thread the ribbon in and out of each letter. Since the bride wanted such big letters, I made 2 banners (rather than one long one). I think this would also have worked with smaller letters (2.5" - 3" tall).


Many, many, many thanks to Cheryl & Juliet who helped me finish up the banner and to B for taking the close up pics.

Photo credits of the lovely couple by the talented photographers Natalia & Christine.

Thanks for looking & taking a sneak peek into this wedding, with more to come! I had so much fun making everything and I had a lot of help from friends & family, which made it even more fun!

EDIT: If you'd like a fast and easy Thank You banner, take a look here: Printable Alphabet Bunting on Ruffled®.

Tuesday, June 8, 2010

Bridal Shower Blooms

Thank you *so* very much for all the sweet, generous comments and feedback on my last project!!! The PWCO Friends & Family blog hop ***winners*** have been announced and one winner came from my comments! Congrats to WENDY!!!

Please send Peggy an email: peggy@paperworksco.com to claim your Safari Friends Collection of stamps! All winners have until next monday (June 14th) to contact Peggy, after that she will select another random comment. :) Now for a new card...


I made this for a bridal shower. I wanted to make a Spring-like card, so I was inspired by the Blooming with Happiness dress, the Birds and Vines cuttlebug folder and, my favourite, cherry blossoms!!!

I added Stickles to the centres of the punched out cherry blossoms and the blooms on the dress. Core'dinations paper and Cuttlebug embossing folders are *made* to go together!!! I sanded the paper a bit more after embossing it, to further bring out the birds and vines.

Thanks for stopping by!

::Supplies::

  • Stamp: Blooming with Happiness (Stampin' Up 2006)
  • Paper: Cherry Cordial (Core'dinations Chocolate Box collection), Prism smooth white, burgundy cardstock from stash
  • Ink: Rhubarb Stalk (Memento ink)
  • Embellishments: Birds and Swirls (Cuttlebug Embossing Folder), Scallop Diamond border punch (Ek Success), white satin ribbon, stickles, small cherry blossom punch by Carl/Carla Crafts, popdots